Last updated: May 21, 2026
Quick Answer
A DIY metal building project follows a clear sequence: plan and permit, prepare the site, pour the foundation, erect the steel frame, install wall and roof panels, and finish with insulation and utilities. Most homeowners with basic construction experience can complete a standard 30×40 ft metal building kit in two to four weekends with two to four helpers. The total cost typically ranges from $8,000 to $30,000 depending on size, kit quality, and site conditions.
Key Takeaways
- Permits are almost always required — skip this step and you risk fines, forced demolition, or insurance voidance.
- A concrete slab is the most reliable foundation for most DIY metal buildings; gravel pads work only for temporary or very light structures.
- DIY saves 30–50% on labor costs compared to hiring a contractor, based on typical contractor quotes versus kit prices (estimate based on industry pricing patterns as of 2026).
- You don’t need specialized tools — a drill, impact driver, level, chalk line, and basic hand tools cover most of the job.
- Pre-engineered metal building kits are the best starting point for beginners; they arrive pre-cut and pre-drilled.
- Insulation is not optional if you plan to use the building year-round — spray foam or rigid board insulation are the top choices.
- The most common mistake is rushing the foundation — an unlevel or undersized slab causes alignment problems throughout the entire build.
- Metal buildings work well for homes, workshops, garages, and barns — not just industrial use.
- A solo builder should expect 2–3x longer build times than a crew of four.
- Choosing the right size upfront prevents costly expansions later — always size up by at least 20%.
Do I Need a Permit for a DIY Metal Building?
Yes, in nearly all jurisdictions you will need at least one permit — often several. Most counties and municipalities require a building permit for any permanent structure over 200 square feet, and many require separate electrical, plumbing, and zoning approvals.
Here’s what to check before you buy a kit:
- Zoning classification: Residential, agricultural, and commercial zones have different rules. A metal workshop may be allowed on agricultural land but restricted in a residential subdivision.
- Setback requirements: Most areas require structures to sit a minimum distance from property lines, roads, and other buildings.
- Wind and snow load codes: Your local building department will specify the structural requirements your kit must meet. Reputable kit suppliers design to these codes — just tell them your zip code.
- HOA rules: Homeowners associations often restrict metal buildings regardless of local permits.
How to get your permit:
- Contact your county building department (most have online portals in 2026).
- Submit site plans, foundation drawings, and the manufacturer’s engineering stamp from your kit.
- Pay the permit fee (typically $100–$600 for a residential structure, varies widely by location).
- Schedule required inspections at foundation, framing, and final stages.
Common mistake: Ordering the kit before the permit is approved. Lead times on kits can run 6–12 weeks, so apply for the permit first, then order once approval looks likely — not after.
How Much Does It Cost to Build a Metal Building Yourself?
DIY metal building costs in 2026 range from roughly $8,000 for a small 20×20 ft kit to $60,000+ for a large 60×100 ft structure with full finishing. The kit itself is only part of the budget.
| Cost Category | Typical Range |
|---|---|
| Metal building kit (materials) | $5,000 – $40,000 |
| Concrete foundation | $3,000 – $15,000 |
| Permits and engineering | $300 – $2,000 |
| Tools and fasteners | $500 – $1,500 |
| Insulation | $1,000 – $6,000 |
| Doors, windows, trim | $500 – $5,000 |
| Electrical/plumbing rough-in | $1,500 – $8,000 |
| Total DIY estimate | $8,000 – $60,000+ |
Note: These are estimates based on 2026 market pricing patterns. Costs vary significantly by region, local labor rates for subcontracted work (like concrete), and material prices.
Where DIY saves the most money: Labor on framing and panel installation is where contractors charge the most. Doing that work yourself can save $10,000–$25,000 on a mid-size building.
Where to spend more: Don’t cut corners on the foundation, anchor bolts, or the kit’s engineering certification. These are the elements that keep the building standing in a storm.
What Tools Do I Need to Construct a Metal Building?
You don’t need a professional contractor’s tool inventory. Most DIY metal building kits are designed for assembly with standard tools most homeowners already own or can rent affordably.
Essential tools:
- Cordless drill and impact driver (18V or higher)
- Self-tapping screw bits (usually included or specified by the kit)
- Chalk line and marking pencil
- 4-ft and 8-ft levels
- Tape measure (at least 25 ft)
- Tin snips (for trimming panels)
- Caulk gun
- Safety glasses, gloves, and hard hat
- Ladder or scaffolding (rent if you don’t own)
Helpful but not essential:
- Magnetic torpedo level
- Pop rivet gun (for trim pieces)
- Circular saw with metal-cutting blade
- Forklift or telehandler (rent for one day — worth every dollar for lifting frames)
Practical tip: Renting a telehandler or forklift for the framing day is one of the best investments you can make. Trying to lift steel columns and rafters manually with a small crew is slow, dangerous, and exhausting.
What Foundation Works Best for Metal Buildings — and Can I Build on a Concrete Slab?
A reinforced concrete slab is the best foundation for most DIY metal buildings, and yes, you can absolutely build directly on a concrete slab. In fact, most pre-engineered metal building kits are specifically designed for slab-on-grade construction.
Foundation options compared:
| Foundation Type | Best For | Limitations |
|---|---|---|
| Concrete slab (4–6 in.) | Permanent garages, workshops, homes | Requires proper site prep and curing time |
| Concrete perimeter/piers | Sloped sites, larger buildings | More complex to DIY |
| Gravel pad | Temporary storage only | Not suitable for permanent structures |
| Helical piers | Poor soil or flood zones | Requires professional installation |
How to prepare a concrete slab for a metal building:
- Grade the site — remove topsoil, compact the subgrade, and add 4–6 inches of compacted gravel base.
- Set forms to the exact dimensions of your building footprint.
- Place rebar or wire mesh according to your local engineer’s specification.
- Set anchor bolts precisely — this is the most critical step. Anchor bolt placement must match your kit’s base plate layout exactly. Double-check measurements before the pour.
- Pour and finish the concrete (minimum 3,000 PSI mix for most building applications).
- Cure for at least 7 days before beginning frame erection — 28 days for full strength.
Edge case: If your site has expansive clay soil or a high water table, consult a geotechnical engineer before pouring. A failed foundation is far more expensive to fix than the consultation fee.
DIY Metal Building Step by Step: The Full Construction Sequence
The complete DIY metal building step by step process follows six major phases: site prep, foundation, frame erection, roofing, wall panels, and finishing. Each phase builds directly on the previous one, so sequence matters.
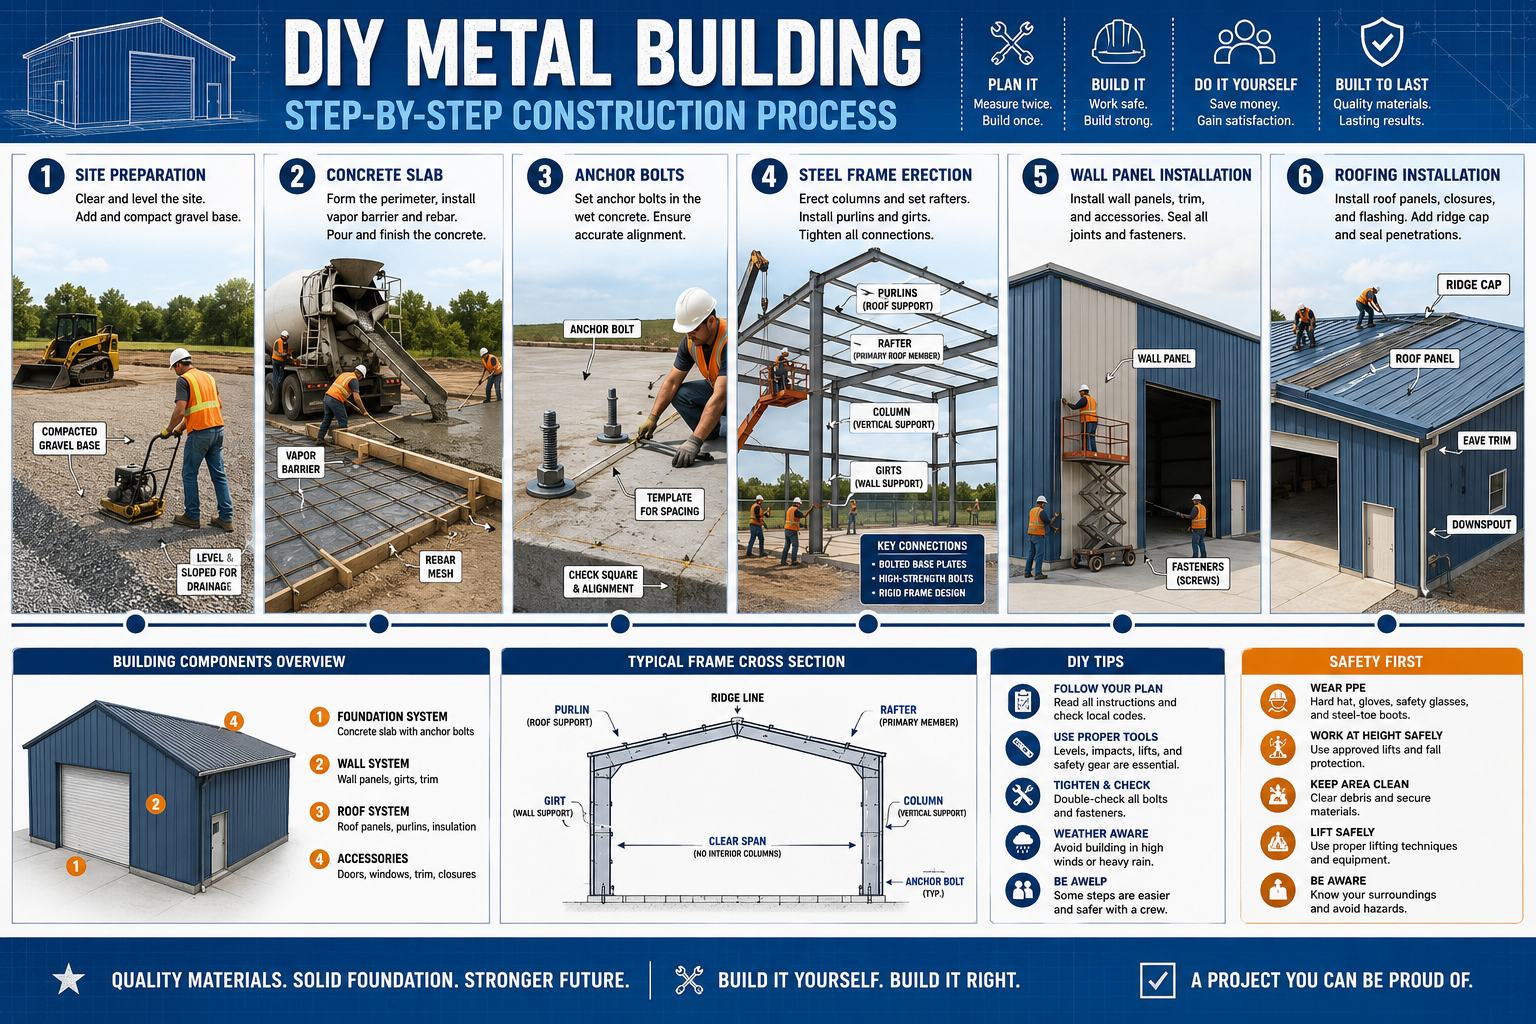
Phase 1: Site Preparation
- Clear vegetation and remove topsoil (typically 6–12 inches).
- Establish a level building pad — use a laser level or builder’s level.
- Compact the subgrade with a plate compactor (rent for $100–$150/day).
- Install drainage if needed (French drain or grading away from the building).
Phase 2: Foundation Pour
- Follow the anchor bolt layout from your kit’s engineering drawings exactly.
- Use a template or jig to hold anchor bolts in position during the pour.
- Allow full cure time before loading the slab.
Phase 3: Frame Erection
- Lay out all components on the ground and identify each piece using the kit’s labeling system.
- Erect the endwall columns first, then connect the rafters at the peak.
- Brace each frame temporarily with cable or lumber until the purlins and girts are installed — an unbraced frame can topple in wind.
- Install purlins (horizontal roof supports) and girts (horizontal wall supports) to tie the frames together.
Phase 4: Roofing
- Install eave trim and ridge cap first.
- Run roof panels from one end to the other, overlapping per the manufacturer’s spec (usually one rib).
- Use the correct self-drilling screws with neoprene washers — over-tightening strips the seal; under-tightening causes leaks.
Phase 5: Wall Panels
- Install corner trim first, then run panels from corner to corner.
- Cut openings for doors and windows with tin snips or a jigsaw with a metal blade.
- Install framed openings (jambs and headers) per the kit drawings before hanging doors.
Phase 6: Finishing
- Seal all penetrations, trim joints, and base trim with appropriate metal building sealant.
- Install insulation (see the insulation section below).
- Run electrical conduit, plumbing rough-in, and HVAC as needed.
- Apply touch-up paint to any scratched or cut edges to prevent rust.
How Long Does It Take to Build a Metal Building Alone or With a Small Crew?
A 30×40 ft metal building kit takes most DIY crews of three to four people approximately three to five weekends (roughly 100–150 person-hours) to complete the shell. Solo builders should plan for two to three times longer.
Time estimates by crew size (30×40 ft building):
| Crew Size | Estimated Time to Shell |
|---|---|
| 1 person | 8–12 weekends |
| 2 people | 4–6 weekends |
| 3–4 people | 2–4 weekends |
| Professional crew | 3–5 days |
What takes the most time:
- Foundation prep and pour (often a separate weekend with cure time in between)
- Frame erection (the most physically demanding day)
- Panel installation (time-consuming but straightforward)
Honest note from experience: The first time I helped a neighbor erect a 40×60 metal building, we underestimated the panel installation by a full day. Metal panels are awkward to handle in any wind at all. Plan your panel days for calm mornings and stop if gusts pick up.
Best Metal Building Kits for Beginners
The best metal building kits for beginners are pre-engineered, fully detailed, and come with a manufacturer’s engineering stamp. Look for kits that include labeled components, step-by-step assembly manuals, and responsive customer support.
What to look for in a beginner-friendly kit:
- Pre-punched or pre-drilled holes — eliminates field drilling and alignment guesswork.
- Color-coded or numbered components — speeds up sorting and reduces errors.
- Included fasteners — some budget kits leave you to source your own hardware.
- Engineering certification — required for permits in most jurisdictions.
- Customer support line — invaluable when you’re standing in a field holding a piece that doesn’t seem to fit.
Choose a kit if:
- You want a permanent structure with a warranty.
- You need engineered drawings for a permit.
- You’re building in an area with specific wind or snow load requirements.
Skip a kit and buy raw steel if:
- You’re an experienced welder building a custom design.
- You need a non-standard footprint or height.
Popular kit suppliers as of 2026 include General Steel, Rhino Steel Building Systems, and Mueller Buildings — compare quotes from at least three suppliers, as prices vary significantly for the same square footage.
Are Metal Buildings Good for Homes, Workshops, or Just Industrial Use?
Metal buildings work well for homes, workshops, garages, barns, and commercial use — they are not limited to industrial applications. The “barndominium” trend has made residential metal buildings mainstream, and many families now live full-time in steel-framed structures.
Metal buildings are a strong choice for:
- Agricultural storage and equipment sheds
- Workshops and home garages
- Residential homes (barndominiums)
- Commercial retail or office space
- Equestrian facilities and riding arenas
Where metal buildings have limitations:
- Urban residential lots with strict aesthetic codes
- HOA communities that prohibit metal exteriors
- Very small structures (under 200 sq ft) where wood framing is simpler and cheaper
Metal Building vs. Wood Building: Pros and Cons
Metal buildings generally outperform wood on durability, pest resistance, and long-term maintenance costs, while wood framing offers easier modification and a more familiar DIY process.
| Factor | Metal Building | Wood Building |
|---|---|---|
| Upfront cost | Higher (kit + concrete) | Lower for small structures |
| Lifespan | 40–60+ years with maintenance | 20–40 years typical |
| Pest resistance | Excellent (no termites) | Vulnerable without treatment |
| Fire resistance | Better | Lower |
| DIY difficulty | Moderate (kit assembly) | Familiar to most DIYers |
| Modification ease | Harder (welding or cutting) | Easy (add walls, outlets) |
| Insulation | Requires added insulation | Easier to insulate |
| Resale value | Growing acceptance | Traditionally higher |
Choose metal if: You want a long-lasting structure with minimal maintenance, you’re in a termite-prone area, or you need a large clear-span space without interior columns.
Choose wood if: You need to modify the layout frequently, you’re building a small structure under 400 sq ft, or local aesthetics and codes favor traditional construction.
Are Metal Buildings Good in Extreme Weather?
Yes — properly engineered metal buildings are among the most weather-resistant structures available for residential and commercial use. Steel frames are designed to specific wind and snow load ratings, and most pre-engineered kits can be specified for hurricane-prone or heavy-snow regions.
- High wind: Metal buildings engineered to 150+ mph wind ratings are available. Always specify your local wind zone when ordering.
- Heavy snow: Snow load ratings (measured in pounds per square foot) must match your local code. Don’t assume a standard kit meets your region’s requirements.
- Hail: Metal roofing and wall panels handle hail better than asphalt shingles but can dent in severe hailstorms.
- Flooding: Metal doesn’t rot or absorb water, but the foundation and any interior finishes are still vulnerable. Elevate the slab if you’re in a flood zone.
- Lightning: Metal buildings are not more likely to be struck by lightning than other structures, but proper grounding is important — consult an electrician.
What Size Metal Building Is Right for My Property?
The right size depends on your primary use, local setback requirements, and your budget — and most builders wish they had gone larger. A common rule of thumb: calculate the space you think you need, then add 20–30%.
Size guidelines by use:
| Use | Recommended Minimum Size |
|---|---|
| Single-car garage | 14×20 ft |
| Two-car garage | 24×24 ft |
| Workshop with storage | 30×40 ft |
| Small barn or equipment shed | 40×60 ft |
| Residential home (barndominium) | 40×60 ft or larger |
Constraints to check first:
- Setback requirements (how far from property lines)
- Maximum lot coverage percentage allowed by zoning
- Height restrictions (especially near airports or in HOA areas)
- Utility easements on your property
How to Insulate a Metal Building Properly
Metal conducts heat and cold efficiently, which means insulation is essential for any building used year-round. Without insulation, a metal building will be unbearably hot in summer, freezing in winter, and prone to condensation that causes rust and mold.
Best insulation options for metal buildings:
- Spray foam (closed-cell): Best overall performance. Seals air gaps, adds structural rigidity, and achieves R-values of R-6 to R-7 per inch. More expensive — typically $1.50–$3.00 per square foot installed (2026 estimate).
- Rigid foam board: Good for walls and under slabs. Easier DIY installation. R-values of R-4 to R-6.5 per inch depending on type.
- Fiberglass batt with vapor barrier: The most affordable option. Works well in walls between girts but requires a proper vapor barrier on the warm side to prevent condensation on metal.
- Reflective insulation (radiant barrier): Good for hot climates to reduce radiant heat gain. Not sufficient as a sole insulation layer in cold climates.
Installation sequence:
- Install insulation before interior wall and ceiling finishes.
- Address the roof deck first — it’s the biggest source of heat gain and loss.
- Seal all penetrations (conduit, pipes, door frames) with spray foam before closing up walls.
- Install a vapor barrier on the warm-in-winter side of the insulation.
Common Mistakes People Make When Building Metal Structures
The most damaging mistakes in DIY metal building projects happen at the foundation and framing stages — errors that are expensive or impossible to fix later.
Top mistakes to avoid:
- Imprecise anchor bolt placement. If anchor bolts are off by even half an inch, base plates won’t align and the entire frame will be out of square. Use a bolt template and check twice before the pour.
- Skipping temporary bracing. An unbraced frame can collapse in moderate wind. Brace each rigid frame as you go — don’t wait until the purlins are on.
- Over-tightening roofing screws. This crushes the neoprene washer and creates a leak path. Tighten until the washer is slightly compressed, not flattened.
- Ignoring drainage. Water pooling against the base of a metal building accelerates rust at the base trim and can undermine the slab edge. Grade the site to drain away from the building.
- Buying the cheapest kit. Low-cost kits often lack engineering stamps, use thinner gauge steel, and come with poor documentation. You’ll spend more fixing problems than you saved.
- Underestimating crew needs. Some panels and frame sections physically cannot be erected safely by one or two people. Plan for at least three people on framing day.
- Not reading the manual before starting. This sounds obvious, but many builders open the kit and start sorting parts without reading the full assembly sequence first. Read it cover to cover before day one.
FAQ: DIY Metal Building Step by Step
Q: Can a complete beginner build a metal building kit?
Yes, with patience and a willing crew of three to four people. Pre-engineered kits are designed for assembly without welding or heavy construction experience. The learning curve is steepest on framing day.
Q: Do metal buildings rust?
Modern metal building panels and frames are galvanized and coated with paint systems designed to resist corrosion for decades. Cut edges and scratched surfaces should be touched up with rust-inhibiting paint to prevent localized rust.
Q: Can I add onto a metal building later?
Yes, but it requires planning. Buy a kit from a manufacturer who offers expansion kits, and make sure the endwall frames are designed for future expansion (called “expandable endwalls”).
Q: How thick should my concrete slab be for a metal building?
A 4-inch slab is the minimum for light storage use. For vehicles, heavy equipment, or residential occupancy, use a 5–6 inch slab with rebar reinforcement. Always follow your local engineer’s specification.
Q: Are metal building kits cheaper than stick-built construction?
For large, clear-span structures (30 ft wide and up), metal kits are generally cheaper per square foot than stick-built wood framing. For small structures under 400 sq ft, the cost difference narrows considerably.
Q: Do I need an engineer for a DIY metal building?
The kit manufacturer’s engineering stamp covers the structural design. You may need a local engineer to certify the foundation design and anchor bolt layout for your specific soil conditions — check with your building department.
Q: Can I install electricity in a DIY metal building myself?
You can run conduit and rough wiring yourself in many jurisdictions, but the final connection to the panel and inspection typically requires a licensed electrician. Check your local electrical code.
Q: How do I prevent condensation inside a metal building?
Proper insulation with a vapor barrier is the primary solution. Ventilation (ridge vents and sidewall vents) also helps. Closed-cell spray foam eliminates condensation most effectively because it creates an air-impermeable barrier.
Q: What gauge steel is best for a DIY metal building?
For the primary frame, 14-gauge or heavier is standard. Wall and roof panels are typically 26-gauge or 29-gauge — 26-gauge is more durable and worth the modest price premium.
Q: How long will a metal building last?
A properly erected and maintained metal building can last 40–60 years or more. The primary maintenance tasks are repainting when the finish shows wear and resealing penetrations and trim joints every 10–15 years.
Conclusion: Your Next Steps for a Successful DIY Metal Building Project
The DIY metal building step by step process is genuinely achievable for most motivated homeowners — but success depends on preparation, not just effort. The builders who struggle are almost always the ones who skipped the planning phase, rushed the foundation, or underestimated how many hands the job requires.
Here’s what to do next:
- Define your use case and size — be honest about what you need now and what you might need in five years.
- Check zoning and permit requirements with your county building department before spending a dollar on materials.
- Get quotes from three to five kit suppliers — specify your location, wind zone, and snow load requirements.
- Plan your foundation — get a local concrete contractor to quote the slab, or get a soil assessment if your ground conditions are uncertain.
- Recruit your crew — identify at least three reliable helpers for framing day before you set a start date.
- Read the full assembly manual before the kit arrives.
A well-built metal building will serve you for decades. Take the time to do it right from the ground up — literally.
References
- Metal Building Manufacturers Association (MBMA). Metal Building Systems Manual. 2023. https://www.mbma.com
- International Building Code (IBC). 2021 International Building Code. International Code Council, 2020. https://www.iccsafe.org
- U.S. Department of Energy. Insulation Materials. Energy.gov, 2023. https://www.energy.gov/energysaver/insulation
- American Iron and Steel Institute (AISI). Cold-Formed Steel Framing Design Guide. 2020. https://www.steel.org